Installing boot9strap (super-skaterhax)
Technical Details (optional)
For technical details on the exploits that you will be using on this page, see here.
相容性資訊
Super-skaterhax (when used to launch the Homebrew Launcher) is compatible with New models on version 11.15.0 and above in all regions.
The instructions provided only apply to the New 3DS, New 3DS XL, and New 2DS XL. Please ensure that the console you are modding is a New 3DS, New 3DS XL, or New 2DS XL before continuing.
必備項目
- The latest release of super-skaterhax (the release
.zipfile) - The latest release of SafeB9SInstaller (direct download)
- The latest release of boot9strap (direct download)
- The latest release of nimdsphax (direct download)
- The latest release of Luma3DS (the Luma3DS
.zipfile)
第一節 — 準備工作
In this section, you will copy the files needed to trigger both super-skaterhax and the Homebrew Launcher.
- Power off your console
- 將 SD 卡插入至電腦中
- 解壓 Luma3DS
.zip內的boot.firm及boot.3dsx到 SD 卡的根目錄底下- 「SD 卡的根目錄」指的是你的 SD 卡含有 Nintendo 3DS 資料夾的目錄,而非該資料夾內部
- Copy everything inside the folder for your console’s region and version (
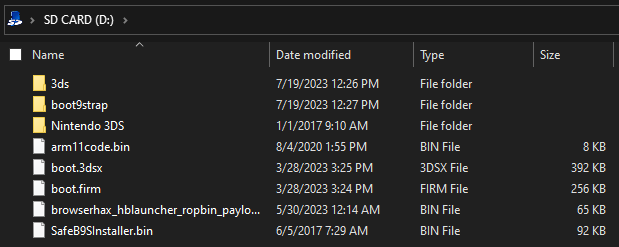
arm11code.binandbrowserhax_hblauncher_ropbin_payload.bin) in the super-skaterhax.zipto the root of your SD card - 在 SD 卡的根目錄底下建立一個新的資料夾
boot9strap - 解壓 boot9strap
.zip的boot9strap.firm及boot9strap.firm.sha檔案至 SD 卡的/boot9strap/資料夾中 - 將 SafeB9SInstaller
.zip中的SafeB9SInstaller.bin複製到 SD 卡的根目錄 - 在 SD 卡的根目錄底下建立一個新資料夾
3ds- This folder stores homebrew applications and data; it is different from the
Nintendo 3DSfolder that the console automatically generates
- This folder stores homebrew applications and data; it is different from the
- Copy the
nimdsphaxfolder from the nimdsphax.zipto the/3ds/folder on your SD card - Reinsert your SD card into your console
- Power on your console
Section II - super-skaterhax
In this section, you will visit the browser exploit webpage, which will launch the Homebrew Launcher.
If you haven’t already, make sure you have a working Internet connection set up on your console.
If your system date is incorrect, this exploit will not work.
Please follow the steps below to set the correct system date.
- Launch System Settings on your console
- 選擇『其他設定 (Other Settings)』
- Navigate to “Date & Time” -> “Today’s date”
- Tap Up/Down Arrows to set the correct Day, Month and Year
- Select OK to confirm
- On the HOME Menu, press the Left and Right shoulder buttons at the same time to open the camera
- If you are unable to open the camera, open the Internet Browser and manually type the URL instead (
https://zoogie.github.io/web/super/for EUR/USA/JPN,https://zoogie.github.io/web/koreafor KOR)
- If you are unable to open the camera, open the Internet Browser and manually type the URL instead (
- Tap the QR code button and scan one of the following QR codes for your console’s region here
- If you get a security certificate warning, press (A) to allow the connection
- Press the (Select) button to open the bookmark tab
- If your (Select) button does not respond, tap the star icon on the bottom-left corner of the screen
- Tap “Bookmark this page”
- Press (B) once to return to the browser
- Press (Start) to open the context menu
- If your (Start) button does not respond, tap the 3-line menu on the bottom-right corner of the screen
- Tap on “Settings”
- Tap on “Delete Cookies”
- 按『A』 繼續
- Press (Home) to return to the HOME Menu, then immediately press (A) to launch the browser again
- Select the “GO GO!” button on the top screen
- If any prompts appear, approve all of them
- If your console freezes on a yellow screen, hold the POWER button until it turns off, then retry this section
- If your console freezes on a red screen, hold the POWER button until it turns off, redo step 3 of Section II, then retry this section
- If your console shows “Text” on the bottom screen, you have an Old 3DS and this exploit will not work on your device. If this is the case, you should follow MSET9 instead
- If you get another error, try again up to 5 times, and if it still doesn’t work, follow this troubleshooting guide
- Your console will have booted into the Homebrew Launcher
- Launch nimdsphax from the list of homebrew
- 如果一切成功的話,您將自動進入 SafeB9SInstaller
- If your console freezes on a red or green screen, hold the POWER button until it turns off, then retry this section
- This may take up to five attempts
第三節 — 安裝 boot9strap
In this section, you will install custom firmware onto your console.
- When prompted, input the key combo given on the top screen to install boot9strap
- If a step on the lower screen has red-colored text, and you are not prompted to input a key combo, follow this troubleshooting guide
- Once it is complete, press (A) to reboot your console
- Your console should have booted into the Luma3DS configuration menu
- Luma3DS configuration menu are settings for the Luma3DS custom firmware. Many of these settings may be useful for customization or debugging
- For the purpose of this guide, leave these options on the default settings (do not check or uncheck anything)
- If your console shuts down when you try to power it on, ensure that you have copied
boot.firmfrom the Luma3DS.zipto the root of your SD card
- 按『Start』鍵以存檔並重新啟動系統
At this point, your console will boot to Luma3DS by default.
- Luma3DS does not look any different from the normal HOME Menu. If your console has booted into the HOME Menu, it is running custom firmware.
- On the next page, you will install useful homebrew applications to complete your setup.