安裝 boot9strap (透過 ntrboot)
若需英語支援,請於 Discord 上的 Nintendo Homebrew 伺服器發問。
如果您喜歡本教學,我們很樂意接受捐贈。
必讀事項
To use the magnet links on this page, you will need a torrent client like qBittorrent or Deluge.
必備項目
- A magnet that triggers the sleep mode of your console (if using a folding style console)
- 一張已寫入 ntrboot 漏洞的燒錄卡
- The latest release of SafeB9SInstaller (direct download)
- The latest release of boot9strap (direct download)
- The latest release of Luma3DS (the Luma3DS
.zipfile)
操作說明
第一節 — 準備工作
- Power off your console
- 將您主機的 SD 卡插入至電腦中
- 這指的是 3DS 的 SD 卡,非燒錄卡中的 SD 卡
- 解壓 SafeB9SInstaller
.zip中的SafeB9SInstaller.firm到 SD 卡的根目錄下,並將其重新命名為boot.firm- 「SD 卡的根目錄」指的是你的 SD 卡含有 Nintendo 3DS 資料夾的目錄,而非該資料夾內部
- 解壓 Luma3DS
.zip內的boot.firm與boot.3dsx到 SD 卡的根目錄底下 - 在 SD 卡的根目錄底下建立一個新的資料夾
boot9strap -
解壓 boot9strap
.zip的boot9strap.firm及boot9strap.firm.sha檔案至 SD 卡的/boot9strap/資料夾中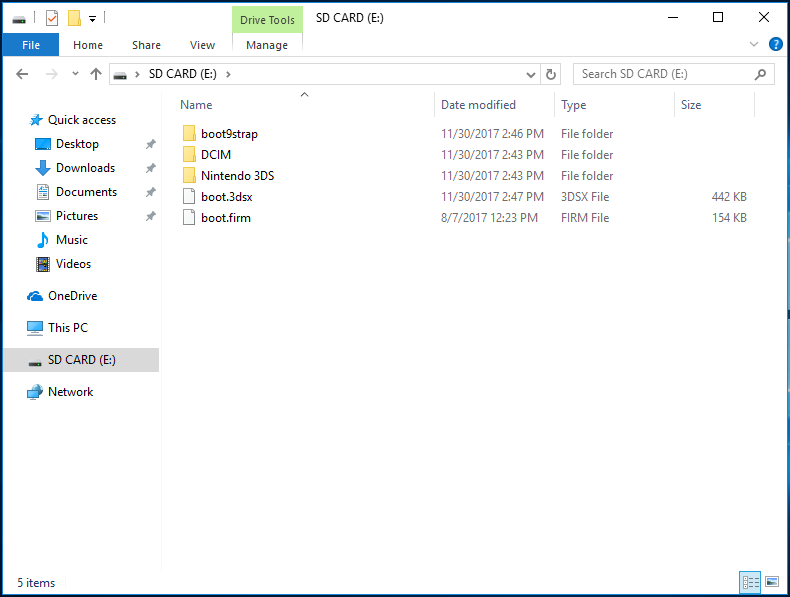
- Reinsert your SD card into your console
- Power on your console
第二節 — ntrboot
- Use the magnet to find the spot on your console where the sleep sensor is triggered
- 舊型 2DS 可跳過本步驟
- Power off your console
- Insert your flashcart into your console
- Place the magnet on your console to trigger the sleep sensor
- 舊型 2DS 可直接開啟睡眠模式開關
- 按住『電源』鍵 +『Start』鍵 +『Select』鍵+『X』鍵個幾秒,並放開
- 您可能得多試幾次,因為這組合有些難按
- 如果一切成功的話,您將自動進入 SafeB9SInstaller
- Remove the magnet from your console
- 舊型 2DS 可直接關閉睡眠模式開關
第三節 — 安裝 boot9strap
In this section, you will install custom firmware onto your console.
- When prompted, input the key combo given on the top screen to install boot9strap
- If a step on the lower screen has red-colored text, and you are not prompted to input a key combo, follow this troubleshooting guide
- Once it is completed, force your console to power off by holding down the power button
- Your console will only boot to the SafeB9SInstaller screen until the next section is completed
第四節 — 設定 Luma3DS
- 將您主機的 SD 卡插入至電腦中
- 將 SD 卡根目錄中的
boot.firm檔案刪除 - 解壓 Luma3DS
.zip內的boot.firm到 SD 卡的根目錄底下 - Reinsert your SD card into your console
- Power on your console
- Your console should have booted into the Luma3DS configuration menu
- Luma3DS configuration menu are settings for the Luma3DS custom firmware. Many of these settings may be useful for customization or debugging
- For the purpose of this guide, leave these options on the default settings (do not check or uncheck anything)
- If your console shuts down when you try to power it on, ensure that you have copied
boot.firmfrom the Luma3DS.zipto the root of your SD card
- 按『Start』鍵以存檔並重新啟動系統
At this point, your console will boot to Luma3DS by default.
- Luma3DS does not look any different from the normal HOME Menu. If your console has booted into the HOME Menu, it is running custom firmware.
- On the next page, you will install useful homebrew applications to complete your setup.
繼續至完成安裝
以下為教您如何回復燒錄卡功能的選用章節 (這樣您可以繼續使用原燒錄卡的功能)。
請注意,即使 Acekard 2i 裝了 ntrboot 漏洞,它仍能保有它原本啟動 .nds 檔案的功能。 不過,這只適用於 NDS 主機或者已安裝某種自製韌體的 3DS 上! 當 Acekard 2i 仍持有 ntrboot 漏洞的情況下,它將無法在 DSi 或尚未改機的 3DS 主機中執行任何 .nds 檔案。
請不要在完成以上節錄前進行本操作。
第五節 — 移除 ntrboot
必備項目
- The latest release of ntrboot_flasher (
ntrboot_flasher.firm) - 對應於您燒錄卡的 flashrom 備份
- 請注意,若您先前已遵循教學寫入 ntrboot 漏洞 (透過多台 3DS 系統),那麼您先前已下載完並將 flashrom 備份放置於正確位置中;也就是說,您不需要再重新下載 flashrom
- 請注意,若您先前已依照寫入 ntrboot 漏洞 (透過單台 3DS 系統)或寫入 ntrboot 漏洞 (透過 NDS)的步驟,那麼 flashrom 備份將已存在於您的 SD 卡中,且應將其複製下列對應位置
- 若您不知道您的 HW revision 編碼為何,您可以每個都試試看。 只有正確的版本號碼才能在 HOME 主選單中正常啟動您的燒錄卡;寫入錯誤的版本將不會造成您的燒錄卡變磚
| 燒錄卡 | 硬體修訂版本 | Flashrom |
|---|---|---|
| Ace3DS X | N/A | |
| Acekard 2i | HW 81 | - Acekard_2i_(HW_81)-Flashrom.zip |
| Acekard 2i | HW 44 | - Acekard_2i_(HW_44)-Flashrom.zip |
| DSTT | 未知 | |
| Infinity 3 R4i | HW A5 | - R4i_Gold_3DS_(HW_A5)-Flashrom.zip |
| R4 3D Revolution | HW A6 | - R4i_Gold_3DS_(HW_A6)-Flashrom.zip |
| R4i Gold 3DS Deluxe “Starter” | 未知 | |
| R4i Gold 3DS | HW 4 | - R4i_Gold_3DS_(HW_4)-Flashrom.zip |
| R4i Gold 3DS | HW 5 | 未知 |
| R4i Gold 3DS | HW 6 | 未知 |
| R4i Gold 3DS | HW 7 | 未知 |
| R4i Gold 3DS | HW 8 | - R4i_Gold_3DS_(HW_8)-Flashrom.zip |
| R4i Gold 3DS | HW D | - R4i_Gold_3DS_(HW_D)-Flashrom.zip |
| R4i Gold 3DS Plus | N/A | |
| R4i Gold 3DS RTS | HW A5 | - R4i_Gold_3DS_(HW_A5)-Flashrom.zip |
| R4i Gold 3DS RTS | HW A6 | - R4i_Gold_3DS_(HW_A6)-Flashrom.zip |
| R4i Gold 3DS RTS | HW A7 | - R4i_Gold_3DS_(HW_A7)-Flashrom.zip |
| R4i Ultra | - R4i_Ultra-Flashrom.zip | |
| R4i-SDHC 3DS RTS | - R4i-SDHC_3DS_RTS_B9S-Flashrom.zip | |
| R4i-SDHC B9S | - R4i-SDHC_3DS_RTS_B9S-Flashrom.zip | |
| 來自 r4isdhc .com 的 R4iSDHC GOLD Pro 20XX | - R4iSDHC.com_20XX-Flashrom.zip | |
| 來自 r4isdhc .com 的 R4iSDHC RTS LITE 20XX | - R4iSDHC.com_20XX-Flashrom.zip | |
| 來自 r4isdhc .com 的 R4iSDHC Dual-Core 20XX | - R4iSDHC.com_20XX-Flashrom.zip |
操作說明
- Power off your console
- 將 SD 卡插入至電腦中
- 這指的是 3DS 的 SD 卡,非燒錄卡中的 SD 卡
- 在 SD 卡的根目錄底下建立一個新的資料夾
ntrboot - 從您的燒錄卡備份
.zip壓縮檔中解壓.bin檔案至 SD 卡中的/ntrboot/資料夾中 - 在 SD 卡的
luma資料夾中建立一個新的資料夾叫做payloads - 複製
ntrboot_flasher.firm至 SD 卡中的/luma/payloads/資料夾中 - Reinsert your SD card into your console
- Insert your ntrboot compatible DS / DSi flashcart into your console
- 開機時按住『Start』鍵啟動 ntrboot_flasher
- 請仔細閱讀警告
- 按『A』 繼續
- 選擇您的燒錄卡
- 如果您沒有看到您的燒錄卡在上列清單中,請仔細閱讀各選項於下螢幕中所顯示的資訊
- 選擇『Restore Flash』
- 按『A』繼續
- 等到檢查完畢為止。
- 按『A』回到主選單
- Press (B) to power off your console