升級 A9LH 至 B9S
若需英語支援,請於 Discord 上的 Nintendo Homebrew 伺服器發問。
如果您喜歡本教學,我們很樂意接受捐贈。
必讀事項
This page is for existing arm9loaderhax users to update their consoles to boot9strap.
未來所有的 Luma3DS 版本都將以 .firm 形式推出,且此格式僅相容於 boot9strap 以及 sighax。 也就是說,如果您想要繼續使用最新版的 Luma3DS,您應透過本章節來更新您的主機。
若要解壓該頁面中的.7z檔案,您將需要一個壓縮檔管理員,如 7-Zip 或 The Unarchiver。
必備項目
To use the magnet links on this page, you will need a torrent client like qBittorrent or Deluge.
請注意,只有在使用 New 3DS 時,secret_sector.bin 是用來還原 arm9loaderhax 漏洞用的,這也就是為什麼在原廠主機上安裝 boot9strap 時不會用到它。 若您的主機不是 New 3DS 的機型,您則不需要使用 secret_sector.bin。
- - New 3DS Users Only: secret_sector.bin (magnet link)
- The latest release of Luma3DS (the Luma3DS
.zipfile) - The v7.0.5 release of Luma3DS (direct download)
- The latest release of SafeB9SInstaller (direct download)
- The latest release of boot9strap (direct download)
操作說明
第一節 — 準備工作
在本節中,請覆蓋所有 SD 卡中可能相衝的檔案。
- Power off your console
- 將 SD 卡插入至電腦中
- Copy
boot.firmandboot.3dsxfrom the latest version Luma3DS.zipto the root of your SD card- 「SD 卡的根目錄」指的是你的 SD 卡含有 Nintendo 3DS 資料夾的目錄,而非該資料夾內部
- 解壓 v7.0.5 Luma3DS
.7z內的arm9loaderhax.bin到 SD 卡的根目錄底下 - 解壓 SafeB9SInstaller
.zip中的SafeB9SInstaller.bin到 SD 中的/luma/payloads/下- 如果沒有
luma或payloads資料夾,請先建立它們 - 刪除其他 SD 卡中
/luma/payloads/(如GodMode9.bin,Decrypt9WIP.bin,Hourglass9.bin等等) 資料夾的.binpayload 檔案,因為它們將無法與 boot9strap 版本的 Luma3DS 相容
- 如果沒有
- 在 SD 卡的根目錄底下建立一個新的資料夾
boot9strap - 解壓 boot9strap
.zip的boot9strap.firm及boot9strap.firm.sha檔案至 SD 卡的/boot9strap/資料夾中 -
僅限 New 3DS 使用者:將
secret_sector.bin複製到 SD 卡的/boot9strap/資料夾中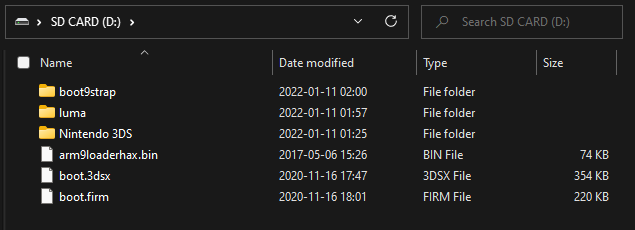
- Reinsert your SD card into your console
第二節 — 安裝 boot9strap
- Boot your console while holding (Start) to launch SafeB9SInstaller
- 若您看到的選單為 Luma 設定選單而非 SafeB9SInstaller,請按下『Start』鍵並將您的主機關機並再試一次
- 如果您在此步驟遇到了錯誤訊息,請試試看使用新的 SD 卡或將它格式化 (請先自行備份檔案)
- 等待所有的安全性檢查檢查完畢
- 如果您遇到『OTP Crypto Fail』的錯誤訊息,請下載 - aeskeydb.bin, then put it in the
/boot9strap/folder on your SD card and try again
- 如果您遇到『OTP Crypto Fail』的錯誤訊息,請下載 - aeskeydb.bin, then put it in the
- When prompted, input the key combo given on the top screen to install boot9strap
- If a step on the lower screen has red-colored text, and you are not prompted to input a key combo, follow this troubleshooting guide
- Once it is complete, press (A) to reboot your console
- Your console should have rebooted into the Luma3DS configuration menu
- Luma3DS configuration menu are settings for the Luma3DS custom firmware. Many of these settings may be useful for customization or debugging
- For the purpose of this guide, these settings will be left on default settings
- If you get a black screen, follow this troubleshooting guide
- 按『Start』鍵以存檔並重新啟動系統