Setup abschließen
Lesen erforderlich
The file boot.firm is what is launched by boot9strap itself after it finishes loading off of NAND. In this case, we are using Luma3DS by LumaTeam to patch the console, allowing it to run homebrew software.
On this page, we will make critical system file backups and install some homebrew programs. Most of these steps will be automated using a script that you will run on your console.
The script will install the following applications:
- FBI (installs CIA formatted applications)
- Homebrew Launcher Loader (launches the Homebrew Launcher)
- Anemone3DS (installs custom themes)
- Checkpoint (backs up and restores save files for 3DS and DS games)
- ftpd (access your 3DS SD card wirelessly)
- Universal-Updater (a homebrew app store for downloading homebrew from the 3DS over Wi-Fi)
- GodMode9 (multipurpose tool which can do NAND and cartridge functions)
If you don’t want one of these applications, you can remove them after you have finished this page by navigating to System Settings -> Data Management -> Nintendo 3DS -> Software. (GodMode9 cannot be removed in this way and is generally required for other functions.)
Kompatibilitätshinweise
If your New 3DS was on version 2.1.0 before following this guide, you should restore your NAND backup before continuing. This likely doesn’t apply to you unless you were following this guide in 2017.
If your previous CFW setup was EmuNAND-based and you wish to move the contents of your EmuNAND/RedNAND to SysNAND, follow Move EmuNAND before following this page. If you don’t know what an EmuNAND is, this doesn’t apply to you.
Was du brauchst
- finalize_helper.firm (direct download)
- finalize.romfs (direct download)
Anleitung
Abschnitt I - Vorbereitungen
In this section, you will copy the files necessary to follow the rest of the instructions on this page.
- Power off your console
- Stecke deine SD-Karte in deinen Computer
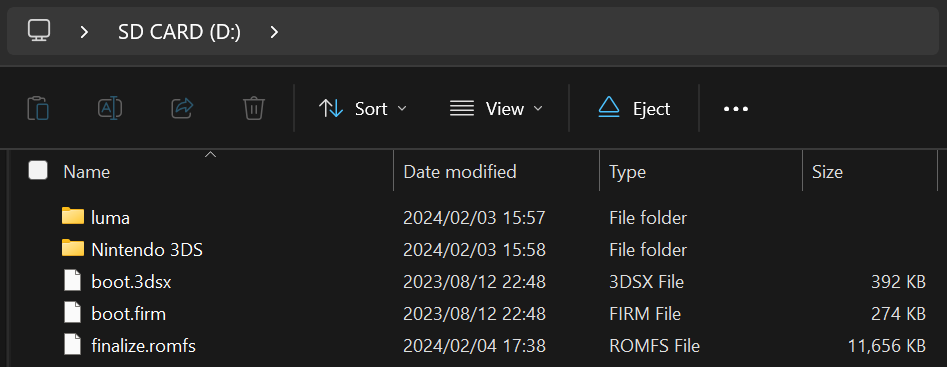
- Copy
finalize.romfsto the root of your SD card - Open the
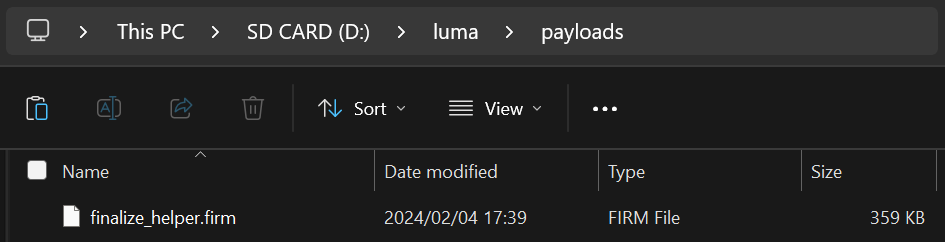
lumafolder on your SD card and create a folder namedpayloadsinside, if it does not already exist - Copy
finalize_helper.firmto thepayloadsfolder - Reinsert your SD card into your console
The screenshot below indicates the minimum SD card layout that is required to follow this page. You may have extra files or folders on your SD card, depending on your previous setup or the method that you followed.
Section II - Updating the System
In this section, you will update your system to the latest version, which is safe to do with custom firmware.
- Führe ein System Update durch, indem du zu den Systemeinstellungen gehst, danach “Allgemeine Einstellungen”, ganz nach rechts navigierst, und dann “System-Update” auswählst
- Updates mit B9S + Luma (welches du hast) sind sicher
- The updater may display a message saying “Your system is up to date” instead of updating. This is normal if you are already up to date; continue to the next section
- If this gives you an error, set both your DNS settings and Proxy settings to “Auto”
- If this still gives you an error, follow this troubleshooting guide
Section III - RTC and DSP setup
In this section, you will sync your 3DS internal clock with the actual time and dump the sound firmware (which is necesssary for some homebrew software to use sound properly).
- Press (Left Shoulder) + (D-Pad Down) + (Select) at the same time to open the Rosalina menu
- If one of these buttons is broken, download config.ini and put it in your
lumafolder, replacing the existing one. This will change the Rosalina menu key combination to (X) + (Y)
- If one of these buttons is broken, download config.ini and put it in your
- Wähle “Miscellaneous options”
- Select “Dump DSP firmware”
- Drücke (B) um fortzufahren
- Select “Nullify user time offset”
- Drücke (B) um fortzufahren
- Drücke (B), um zum Rosalina-Hauptmenü zurückzukehren
- Drücke (B), um das Rosalina-Menü zu schließen
Section IV - Setup Script
In this section, you will use a series of scripts to automate homebrew installation, SD card cleanup, and system file backup.
- Power off your console
- Drücke und halte (Start), und während du (Start) hältst, schaltest du deine Konsole ein. This will launch the Finalizing Setup Helper
- If you boot to the Luma3DS configuration menu, you held SELECT instead of START
- If you boot to the HOME Menu, your
payloadsfolder may be incorrectly spelled or in the wrong location - If you see a “Luma3DS Chainloader” menu, use the D-Pad and (A) buttons to navigate to and select
finalize_helperfrom the list - If you encounter an error, consult the troubleshooting page
- If the Helper was successful, your console will boot into GodMode9
- From this point forward, you can access GodMode9 by holding START while powering on your console
- Wenn du aufgefordert wirst, ein “essential files backup” durchzuführen, drücke (A). Drücke erneut (A) nachdem es abgeschlossen ist
- Wenn du aufgefordert wirst Datum und Uhrzeit der “RTC” (Real Time Clock, Echtzeituhr) zu korrigieren, drücke (A), stelle Datum und Uhrzeit ein und drücke (A) um fortzufahren
- Drücke (Home), um das Aktionsmenü aufzurufen
- Wähle “Scripts”
- Select “finalize”
- Follow the prompts in the script, answering any questions that you are asked
- If you encounter an error, follow the instructions in the error message or consult the troubleshooting page
- Once the script says “Setup complete!”, press (A) to power off the device
- If you do NOT see the message “Setup complete!”, the script was not successful and you will need to redo this section from Step 3
- Stecke deine SD-Karte in deinen Computer
- Copy the
/gm9/backups/folder to a safe location on your computer- This folder contains critical file backups and should be backed up to multiple locations (i.e. cloud storage) if possible
- The two SysNAND files are your NAND backup and can be used to revert your console to a working state if it is bricked by a software issue
- The
essential.exefsfile contains your console’s system-unique files and can be used to recover your data in the event of a hardware failure
- If you still have them, delete the two
SysNANDfiles from the/gm9/backups/folder from your SD card- The
essential.exefsfile is small and may be kept on your SD card for ease of access
- The
You’re done! Custom firmware is now fully configured on your console.
Trying to figure out what to do with your newly modded device? Visit our wiki!
Information and Notes
Here are some key combos that you should know:
- Holding (Select) on boot will launch the Luma3DS configuration menu.
- Holding (Start) on boot will launch GodMode9, or if you have multiple payloads in
/luma/payloads/, the Luma3DS chainloader. - By default, pressing (Left Shoulder) + (Down D-Pad) + (Select) while in 3DS mode will open the Rosalina menu, where you can check system information, take screenshots, enable cheats, and more. This can be changed from the Rosalina menu.
- Holding (Start) + (Select) + (X) on boot will make the notification LED show a color for debug purposes. See the changelog for a list.
For information on using GodMode9’s various features, check out the GodMode9 Usage and Dumping Titles and Game Cartridges pages.